Saturday, December 18, 2010

Gingerbread Nativity Scene

Have you always had a secret longing to "eat" Christmas? How about a gingerbread nativity scene?

I used this recipe: http://www.taste.com.au/recipes/9761/gingerbread+men It was the right amount and great tasting gingerbread. Baby Jesus is a jellybaby, the sheep are marshmallows and everthing else is made from lollies and icing sugar.
The kids couldn't wait to eat it

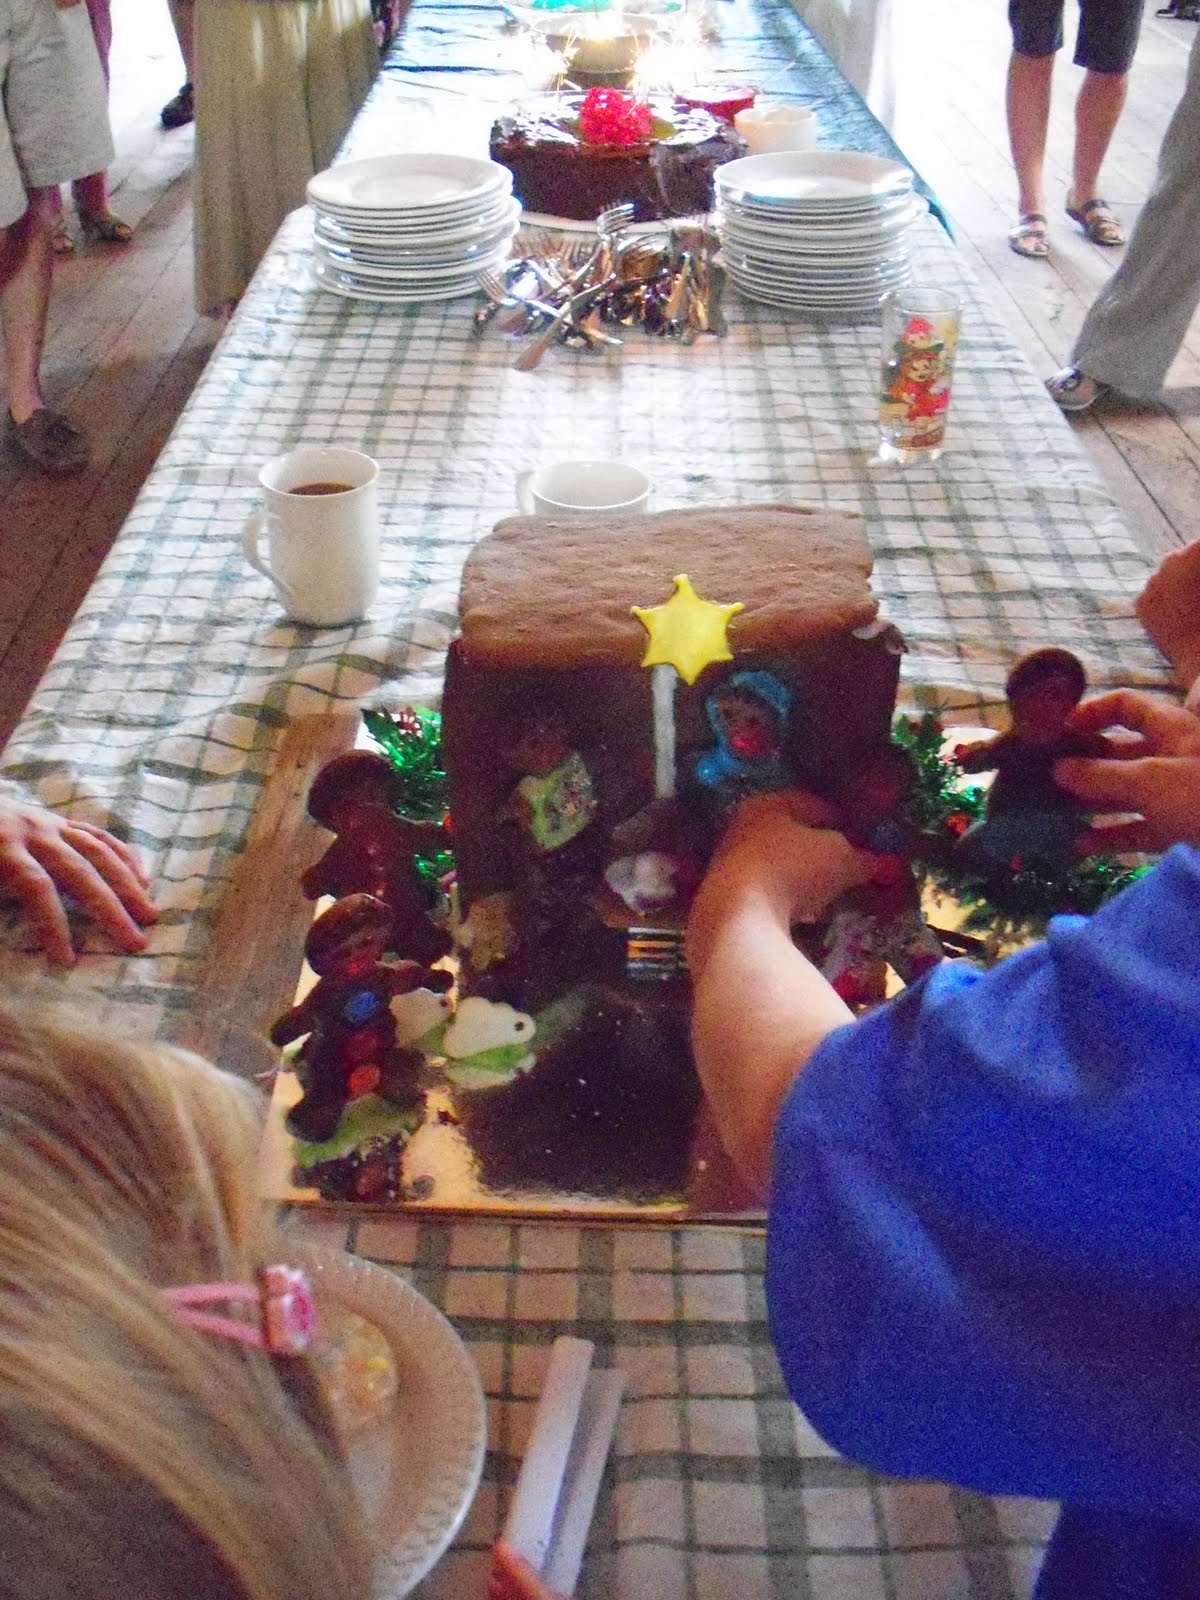
There .... demolished in less than 2 minutes!

Tuesday, October 26, 2010

TUTORIAL: Waldorf Gingerbread Men

These little gingerbread men are made from pure wool felt, though they look yummy enough to eat!


A cookie cutter works great as a pattern template:


I started sewing the two pieces of felt together at the first foot, then outside of the leg, all the way around the body and finished at the bottom of the second foot.
Then I stuffed them with wool, making sure I got the stuffing right into their hand. I then finished sewing up the stuffing hole
and trimmed the arms and feet with braid. The buttons and bow tie are made from black felt. I sewed the black bead eyes, starting my needle from the side of the head and finishing at the other side. The mouth is made from red emboidery thread and I used 2 stitches to make a smiling mouth, also starting and finishing at the side of the head. Sew some gold thread for hanging on top of the head.

Tuesday, October 12, 2010

TUTORIAL: Hair Layering

I've been using this homemade tool, made by my husband, for the past few years. It makes the hair strands all the same length in layers, and saves lots of time. The hair layering tool is 22" in length, the pegs and 21" and 8" apart, and these 3 pegs can make 5 different hair lengths.

For a long haired 16" Child Doll, like my Radiance Child pattern, you would use 2 different layers for the hair. The first layer would be shorter and would be hooked into the crochet cap of the lower part of the head. To make these first hair lengths you would wrap the yarn around the 8" wide pegs.

Then you would cut one end:
Open them out:

Double them over and hook them into the back of the head of your doll's already crocheted cap:
Once the strands have come up to about half way or more up the head, you would wrap a second batch of yarn around the outside pegs:

Cut this batch at BOTH even ends, so you have a bunch of equal 18-20" strands:

The long strands are hooked into the top and crown of the head. Once finished, use your fingers to comb her hair so that it falls nicely. And here is the finished product! And she is available for sale either on my website, or on from my Etsy site:
Plus, if you dont' want to make one of those layering tool, then you can purchase a handmade one from me for $15.

~~~~~~~~~~~~~~~~~~~~~~~~~~~~~~~~~~~~~~~~~~~~~~~~~~~~~

Friday, June 18, 2010

Who Said Boys Don't Play With Dolls?


These gorgeous boys, with their baby sister, requested girl dolls dressed only in pink and with long hair. Their mother tried to convince them that they would prefer boys, but they were adamant they had to be girls in pink, and with "flowers in their hair"! Thanks for the pic Jodi.

Friday, April 9, 2010

Finishing Touches that make a difference

If you are using light colored hair, cover the embroidery thread with a small patch of tricot. You can either glue it on or sew it; If you don't put a patch over the thread, you would see it under the hair, but this way, it is hidden and looks more professional;


Friday, April 2, 2010

Tip of the Day: Make sure your eyeline doesn't move

Symmetry and proportion of the body, and especially the face, are very important factors in making your dolls look good. Here is a tip to make sure the string eyeline doesn't move about when you pull the head covering over the sculpted head. Sew a few stitches with the string lying on the line that you drew when you measured the half way mark, before pulling the tricot cover over the inner head.


Tuesday, March 23, 2010

Easter Market Day

I will be at the Easter Market Day at around 8.30am, on the 30th of March at the Perth Waldorf School, Bibra Lake. If you have any questions about making dolls, you are very welcome to come and have a chat with me there. I will have DVDs and dolls for sale that day. Hope to see you there!

Shipping Prices for DVD

There was an error in the shipping prices for the DVD, ie it was charging too much shipping, which has now been corrected. The price for shipping the DVD within Australia is AU$1.50, and internationally AU$4.99.

Monday, February 15, 2010

It's All Happening

Now that the school holidays have finished it's back to sewing again! I'm currently working on a couple of orders, then I plan to make more dolls for the "Buy It Now" page. Just contact me if you have any questions. I've got no idea where my Etsy widget has run off to, but I still have quite a few dolls on Etsy and the same dolls on my website; click on the page; "Dolls Ready To Go Home".

Tuesday, November 24, 2009

Christmas Stars!

These stars don't look much while you're making them, but when you put them onto the window, they actually glow. Here is how to make them.
First buy some "kite paper" from your nearest Waldorf supplier. I got ours from Southern Aurora Books in Bibra Lake. If you're not in Perth, try your local Waldorf supplier, ie Willowwood Cottage or even ebay.


Fold the paper in half (to make this step faster, carefully place 4-6 pages together, making sure they don't slip and cut them all together), cut exactly down the centre, place them all together then fold again lenthways, and cut again. Repeat and cut them widthways, so you will have lots of rectangular coloured pieces of kite paper.


Fold the corners inwards on each piece as shown, then on only one end fold over again, as shown.
Once you have lots of 'uneven' dimond shapes, place a small amount of glue on the spots shown, being careful not to apply too much or your star will stick to whatever surface you're working on.


Place each 'diamond' on top of the other until
you reach the last one, which you will need to slot into place and onto a small amount of glue on the back of the starting diamond.


Hang in the window and admire!


Sunday, November 15, 2009

Cute & Goofy St Nick's Characters

It's only three weeks until St Nicholas day, so we got this St Nicholas and Black Peter pompom children's kit from Witte Engel in Holland and had fun making them up:
The kit ccomes with a pom pom maker, and my son had a ball with it. We made the little presents out of covered match boxes and the basket we found in Spotlight.

Friday, September 11, 2009

How To Choose Good Stuffing Wool

Here is a photo of two types of wool strands. The top one is felting wool and the lower one is stuffing wool. The difference is that the felting wool is much finer and more silky. The lower one is courser and has more space between the fibres. If you stuff dolls with finer, felting type wool, you will end up with more of a lumpy look, you will use a lot more, and it will be much harder work. Also, it is vital that the wool used for stuffing is completely dry of any Lanolin. Even a small amount of "grease" will eventually seep through the doll's tricot skin and create a "greasy" look!

Wednesday, August 19, 2009

New looks for dolls


I now have these great new onesies in really beaut colours. So if you order a Dreamtime baby doll, you can have them dressed in one of these if you like... or stick with the old style.
And the Child Dolls with streaks in their hair, pants and tops and more interesting colours. The boy dolls remain traditional knights and Frodos, which are the most popular, and you can still order traditional girl dolls.

Wednesday, June 24, 2009

The Pearl At The Centre of the Spiral

Our local Waldorf school celebrated mid winter with the interactive story of Yentz who goes off in search of the lost pearl, that is his inheritance. The children follow behind Yentz with their colourful handmade lanterns, as he stops to pass various character tests along the way around the school grounds, which is made up of bushland. Finally, he finds his way to the cavern where his lost pearl is at the centre of a beautiful spiral of fresh bouganvillia flowers. I was one of the spiral singers, so the only photos I could get were these taken during the warm ups.

Tuesday, April 21, 2009

The "Sewn" Farmyard!

What do you do if you drool over The Knitted Farmyard pics, yet you can't knit very well? Easy: just create a farmyard out of leftover fabrics and old sweaters, and sew them together like a quilt. This is as far as I got, since I had to work this week; there are still houses to make, but we're having fun with it already.

Tuesday, April 7, 2009

Da Vinci's Last Supper Waldorf Style

Jesus and the 12 disciples were made using the wood and wire dolls, with both felt and silk clothes and wool tops for hair (click on the pic for a clearer version).
Something interesting about this famous Da Vinci painting from my Foundations in Anthroposophy course a few years ago; our lecturer showed us the "wave" pattern created by the hands. Check out the pink line I've drawn on the painting below. I tried very hard to bend the little dolls hands (above) into the same "wave" pattern!

Thursday, April 2, 2009

The Rule of Six

I got this little list from this blog. It's short, powerful and easy to remember.

Six Things to Include in Your Child's Day:

• meaningful work
• imaginative play
• good books
• beauty (art, music, nature)
• ideas to ponder and discuss
• prayer

Monday, March 9, 2009

Sculpture By The Sea

Every year Cottestloe Beach has a Sculpture By The Sea event. I liked this one:


My son and dh liked the "Lifesavers";


The setting sun and a swim ended off the evening:

Saturday, February 28, 2009

St Patrick

Here is St Patrick ready for St Patrick's day in 2 weeks. He is made with those incredibly versatile wood and wire dolls you can get at most Waldorf craft outlets. He is holding the famous "shamrock". Saints make great role models in extraordinary and "superhuman" courage and virtue. Kids love the story of St Patrick, especially the part where he bangs his staff on the ground and all the snakes go into the sea!

Wednesday, February 4, 2009

A Possum is not an Opossum


Possums in Australia are CUTE! This caused some confusion to my American customers because they thought I was making an Opossum, which is apparently not a cuddly cutsie like the possum.


To clear that up, here is a pic of a REAL possum, from Australia. How cute is that?


I made this possum from the Hedgehog pattern in the book; "Trudy's Tiere"which is in German or Dutch, not English, and can be purchased from Witte Engel. It doesn't matter if you don't speak German or Dutch as the patterns are fairly straight forward. Just one thing - the patterns are without hems added, so be sure to add your hems all the way around the pattern.